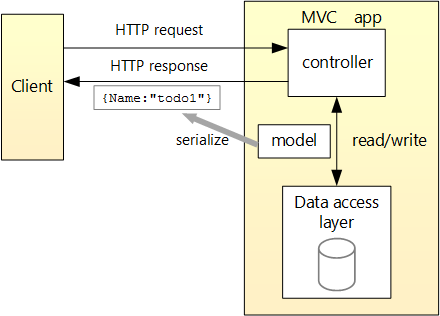


RESTful APIs are the backbone of modern web applications, allowing different systems to communicate seamlessly. ASP.NET Core provides a flexible framework for building efficient, scalable REST APIs using C#. This guide will walk you through creating a RESTful API in ASP.NET Core, covering essential components such as controllers, routing, and data handling with Entity Framework Core.
What is ASP.NET Core?
ASP.NET Core is an open-source, cross-platform framework for building high-performance, cloud-ready applications. It’s designed to support the development of REST APIs that are easy to deploy on various platforms, including Windows, Linux, and macOS. With powerful tools and an extensive library ecosystem, ASP.NET Core makes building APIs straightforward and efficient.
Setting Up the Project
To start, make sure you have the .NET SDK installed. Open your terminal or command prompt and create a new ASP.NET Core Web API project.
dotnet new webapi -o MyAPI
cd MyAPI
This command generates a template for a Web API project. Inside this template, you’ll find default configurations and folders, including Controllers for API endpoints and Models for data representations.
Creating a Data Model
Define a simple data model to represent the data in your API. Let’s create a Product model for this example.
// Models/Product.cs
namespace MyAPI.Models
{
    public class Product
    {
        public int Id { get; set; }
        public string Name { get; set; }
        public decimal Price { get; set; }
    }
}
Setting Up the Database with Entity Framework Core
Add Entity Framework Core to handle data persistence. In your project directory, install the required NuGet packages:
dotnet add package Microsoft.EntityFrameworkCore
dotnet add package Microsoft.EntityFrameworkCore.SqlServer
dotnet add package Microsoft.EntityFrameworkCore.Tools
Configure the database context by creating a ProductContext class.
// Data/ProductContext.cs
using Microsoft.EntityFrameworkCore;
using MyAPI.Models;

namespace MyAPI.Data
{
    public class ProductContext : DbContext
    {
        public ProductContext(DbContextOptions<ProductContext> options) : base(options) {}

        public DbSet<Product> Products { get; set; }
    }
}
Now, add the database connection string and configure the service in appsettings.json.
// appsettings.json
"ConnectionStrings": {
  "DefaultConnection": "Server=(localdb)\\mssqllocaldb;Database=MyAPIDb;Trusted_Connection=True;MultipleActiveResultSets=true"
}
Then, register the database context in Program.cs.
// Program.cs
using Microsoft.EntityFrameworkCore;
using MyAPI.Data;

var builder = WebApplication.CreateBuilder(args);

builder.Services.AddControllers();
builder.Services.AddDbContext<ProductContext>(options =>
    options.UseSqlServer(builder.Configuration.GetConnectionString("DefaultConnection")));

var app = builder.Build();
app.MapControllers();
app.Run();
Adding a Controller
In ASP.NET Core, controllers handle incoming HTTP requests and return responses. Create a ProductsController to define the RESTful endpoints.
// Controllers/ProductsController.cs
using Microsoft.AspNetCore.Mvc;
using Microsoft.EntityFrameworkCore;
using MyAPI.Data;
using MyAPI.Models;

namespace MyAPI.Controllers
{
    [Route("api/[controller]")]
    [ApiController]
    public class ProductsController : ControllerBase
    {
        private readonly ProductContext _context;

        public ProductsController(ProductContext context)
        {
            _context = context;
        }

        // GET: api/products
        [HttpGet]
        public async Task<ActionResult<IEnumerable<Product>>> GetProducts()
        {
            return await _context.Products.ToListAsync();
        }

        // GET: api/products/5
        [HttpGet("{id}")]
        public async Task<ActionResult<Product>> GetProduct(int id)
        {
            var product = await _context.Products.FindAsync(id);

            if (product == null)
            {
                return NotFound();
            }

            return product;
        }

        // POST: api/products
        [HttpPost]
        public async Task<ActionResult<Product>> CreateProduct(Product product)
        {
            _context.Products.Add(product);
            await _context.SaveChangesAsync();

            return CreatedAtAction(nameof(GetProduct), new { id = product.Id }, product);
        }

        // PUT: api/products/5
        [HttpPut("{id}")]
        public async Task<IActionResult> UpdateProduct(int id, Product product)
        {
            if (id != product.Id)
            {
                return BadRequest();
            }

            _context.Entry(product).State = EntityState.Modified;

            try
            {
                await _context.SaveChangesAsync();
            }
            catch (DbUpdateConcurrencyException)
            {
                if (!ProductExists(id))
                {
                    return NotFound();
                }
                else
                {
                    throw;
                }
            }

            return NoContent();
        }

        // DELETE: api/products/5
        [HttpDelete("{id}")]
        public async Task<IActionResult> DeleteProduct(int id)
        {
            var product = await _context.Products.FindAsync(id);
            if (product == null)
            {
                return NotFound();
            }

            _context.Products.Remove(product);
            await _context.SaveChangesAsync();

            return NoContent();
        }

        private bool ProductExists(int id)
        {
            return _context.Products.Any(e => e.Id == id);
        }
    }
}
Testing the API Endpoints
With the controller in place, you now have a functional REST API. To test the endpoints, you can use tools like Postman or Swagger UI, which is integrated by default in new ASP.NET Core Web API projects.
- GET
/api/products: Retrieves all products. - GET
/api/products/{id}: Retrieves a single product byid. - POST
/api/products: Creates a new product. Pass theProductobject in the request body. - PUT
/api/products/{id}: Updates an existing product byid. - DELETE
/api/products/{id}: Deletes a product byid.
Adding Swagger for API Documentation
To make testing and documentation easy, ASP.NET Core offers integrated Swagger support. Enable it in Program.cs:
// Program.cs
var builder = WebApplication.CreateBuilder(args);

builder.Services.AddControllers();
builder.Services.AddEndpointsApiExplorer();
builder.Services.AddSwaggerGen();

var app = builder.Build();

if (app.Environment.IsDevelopment())
{
    app.UseSwagger();
    app.UseSwaggerUI();
}

app.MapControllers();
app.Run();
When you run the application, Swagger will be available at http://localhost:5000/swagger. This interface provides a user-friendly way to explore and test your API.
Conclusion
ASP.NET Core simplifies building RESTful APIs with features that support modular code, secure data handling, and easy deployment across platforms. By following this guide, you now have a foundational API with endpoints for creating, retrieving, updating, and deleting resources. Whether you’re building microservices or larger applications, ASP.NET Core’s scalability and efficiency make it an excellent choice for modern API development.
Final Tips
- Secure your API: Use authentication and authorization mechanisms like JWT for secure access.
- Optimize Database Performance: Utilize query optimizations and caching.
- Implement Error Handling: Ensure that all endpoints return meaningful error responses.
Following these practices will allow you to build robust, scalable APIs with ASP.NET Core. Happy coding!
Leave a Reply