

One of the key concepts in Angular 2+ is component-based architecture, where the UI is split into independent, reusable components. However, as the application grows, components need to interact with each other. Angular provides robust mechanisms for managing component communication, specifically for sharing data between parent and child components. This article will guide you through various methods for component interaction in Angular 2+, from simple property binding to more advanced techniques like service-based communication.
Why is Component Communication Important?
In Angular, the component-based architecture ensures modularity, making code easier to manage and maintain. However, it also brings the challenge of ensuring components can communicate efficiently without causing excessive dependencies. Understanding these communication patterns will help you build scalable applications with clean code and better performance.
Communication from Parent to Child
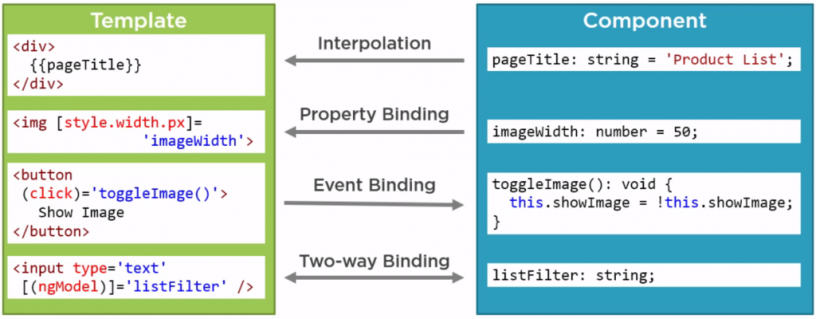
1. Input Property Binding
The most common way to pass data from a parent to a child component is using the @Input() decorator. This binds a property in the child component to a value in the parent component.
Example: Using @Input()
In this example, we have a parent component that sends data to a child component.
// Parent Component (app-parent.component.ts)
import { Component } from '@angular/core';

@Component({
  selector: 'app-parent',
  template: `<app-child [childMessage]="parentMessage"></app-child>`
})
export class ParentComponent {
  parentMessage = 'Hello from Parent!';
}
// Child Component (app-child.component.ts)
import { Component, Input } from '@angular/core';
@Component({
selector: 'app-child',
template: `<p>{{ childMessage }}</p>`
})
export class ChildComponent {
@Input() childMessage: string = '';
}In this example, parentMessage is bound to childMessage using [childMessage]="parentMessage".
Communication from Child to Parent
2. Output Event Emitter
The @Output() decorator and EventEmitter class allow a child component to emit an event to a parent component. This is a powerful way to notify the parent when something happens in the child component.
Example: Using @Output()
// Parent Component (app-parent.component.ts)
import { Component } from '@angular/core';

@Component({
  selector: 'app-parent',
  template: `
    <app-child (messageEvent)="receiveMessage($event)"></app-child>
    <p>{{ message }}</p>
  `
})
export class ParentComponent {
  message: string = '';

  receiveMessage(event: string) {
    this.message = event;
  }
}
// Child Component (app-child.component.ts)
import { Component, Output, EventEmitter } from '@angular/core';
@Component({
selector: 'app-child',
template: `<button (click)="sendMessage()">Send Message</button>`
})
export class ChildComponent {
@Output() messageEvent = new EventEmitter<string>();
sendMessage() {
this.messageEvent.emit('Hello from Child!');
}
}In this example, when the button is clicked, sendMessage() emits a message to the parent component.
Using ViewChild for Parent to Child Communication
@ViewChild allows a parent component to access a child component’s methods and properties. This is useful when the parent needs to directly interact with the child component’s functionality.
Example: Using @ViewChild
// Parent Component (app-parent.component.ts)
import { Component, ViewChild } from '@angular/core';
import { ChildComponent } from './child.component';

@Component({
  selector: 'app-parent',
  template: `
    <app-child></app-child>
    <button (click)="callChildFunction()">Call Child Method</button>
  `
})
export class ParentComponent {
  @ViewChild(ChildComponent) child!: ChildComponent;

  callChildFunction() {
    this.child.childMethod();
  }
}
// Child Component (app-child.component.ts)
import { Component } from '@angular/core';
@Component({
selector: 'app-child',
template: `<p>Child Component</p>`
})
export class ChildComponent {
childMethod() {
console.log('Child method called!');
}
}In this example, the parent component can call childMethod() in the child component directly using @ViewChild.
Using Service-Based Communication for Sibling Components
When two sibling components need to communicate, using a shared service is often the most efficient method. This service can act as a communication channel between the components, storing and broadcasting data.
Example: Using a Service for Sibling Communication
Create a service that holds the message data.
// MessageService (message.service.ts)
import { Injectable } from '@angular/core';
import { BehaviorSubject } from 'rxjs';

@Injectable({
  providedIn: 'root'
})
export class MessageService {
  private messageSource = new BehaviorSubject<string>('default message');
  currentMessage = this.messageSource.asObservable();

  changeMessage(message: string) {
    this.messageSource.next(message);
  }
}
Sibling Component 1 (Sender)
// Sender Component (sender.component.ts)
import { Component } from '@angular/core';
import { MessageService } from './message.service';

@Component({
  selector: 'app-sender',
  template: `<button (click)="sendMessage()">Send Message</button>`
})
export class SenderComponent {
  constructor(private messageService: MessageService) {}

  sendMessage() {
    this.messageService.changeMessage('Hello from Sender!');
  }
}
Sibling Component 2 (Receiver)
// Receiver Component (receiver.component.ts)
import { Component, OnInit } from '@angular/core';
import { MessageService } from './message.service';

@Component({
  selector: 'app-receiver',
  template: `<p>{{ message }}</p>`
})
export class ReceiverComponent implements OnInit {
  message: string = '';

  constructor(private messageService: MessageService) {}

  ngOnInit() {
    this.messageService.currentMessage.subscribe(
      message => (this.message = message)
    );
  }
}
In this example, SenderComponent changes the message in the MessageService, and ReceiverComponent listens to it and updates its display.
Summary
Angular 2+ provides various techniques for component communication, making it easy to share data and trigger actions between parent and child components or even across sibling components. By using @Input() and @Output(), @ViewChild, and service-based communication, you can manage complex interactions while keeping your application modular and maintainable.
Final Tips
- Use Angular’s async pipe: This is helpful when dealing with observables in templates, as it automatically subscribes and unsubscribes.
- Minimize Direct Dependencies: Avoid too many
@ViewChildreferences, as they can create tight coupling between components. - Centralize State Management for Complex Scenarios: In larger applications, consider using state management libraries (e.g., NgRx) for consistent state sharing.
Mastering component communication in Angular will ensure your application remains modular, responsive, and easy to maintain. Good luck and happy coding!
Leave a Reply