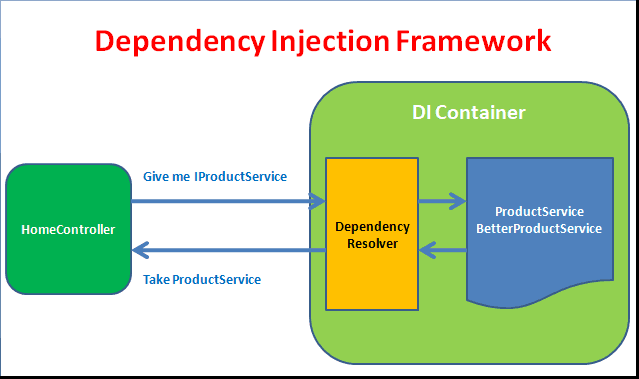
Dependency Injection (DI) is a fundamental concept in ASP.NET Core that helps in managing object creation and ensuring loose coupling between components. ASP.NET Core comes with built-in support for Dependency Injection, making it easier to implement decoupled code and promote code reusability, testability, and maintainability.
In this article, we will explore the concept of Dependency Injection in ASP.NET Core, discuss its types, and provide practical examples to illustrate how it works.
What is Dependency Injection?
Dependency Injection is a design pattern where the dependencies (i.e., services or components) required by a class are provided externally rather than the class creating them internally. In simple terms, instead of a class instantiating its own dependencies, these dependencies are injected into the class by a framework or an external service container.
Benefits of Dependency Injection:
- Decoupling: It reduces the tight coupling between components, making code more modular.
- Testability: Classes are easier to test because you can inject mock dependencies for unit tests.
- Maintainability: Since dependencies are defined externally, it’s easier to swap implementations without modifying the class that depends on them.
Types of Dependency Injection in ASP.NET Core
In ASP.NET Core, services can be registered with the built-in Dependency Injection container with different lifetimes:
- Transient: A new instance of the service is created each time it is requested.
- Scoped: A new instance is created once per request within the scope.
- Singleton: A single instance is created and shared throughout the application’s lifetime.
Setting Up Dependency Injection in ASP.NET Core
In ASP.NET Core, the Startup.cs class is responsible for configuring the services and the request pipeline. The ConfigureServices method in Startup is where you register services with the DI container.
Example: Registering Services
In this example, we’ll register two simple services: ILoggerService and its implementation ConsoleLogger.
// Step 1: Define the interface
public interface ILoggerService
{
    void Log(string message);
}

// Step 2: Create a class that implements the interface
public class ConsoleLogger : ILoggerService
{
    public void Log(string message)
    {
        Console.WriteLine($"Log: {message}");
    }
}

// Step 3: Register the service in the DI container (Startup.cs)
public class Startup
{
    public void ConfigureServices(IServiceCollection services)
    {
        services.AddTransient<ILoggerService, ConsoleLogger>(); // Transient lifetime
    }

    public void Configure(IApplicationBuilder app, IHostingEnvironment env)
    {
        // ...
    }
}
Injecting Dependencies in Controllers
Once you’ve registered the services, you can inject them into your controllers or other classes using constructor injection.
Example: Injecting a Service into a Controller
public class HomeController : Controller
{
    private readonly ILoggerService _logger;

    // Dependency Injection via the constructor
    public HomeController(ILoggerService logger)
    {
        _logger = logger;
    }

    public IActionResult Index()
    {
        _logger.Log("Home page loaded.");
        return View();
    }
}
In the above example, ILoggerService is injected into the HomeController through its constructor, and the ConsoleLogger implementation is used.
Service Lifetime in ASP.NET Core
As mentioned earlier, the lifetime of a service defines how long an instance of the service exists. Here’s how you can use different lifetimes for services:
- Transient: A new instance is created every time the service is requested.
services.AddTransient<ILoggerService, ConsoleLogger>();- Scoped: A new instance is created once per request.
services.AddScoped<ILoggerService, ConsoleLogger>();- Singleton: A single instance is created and reused for the entire application’s lifetime.
services.AddSingleton<ILoggerService, ConsoleLogger>();Example: Service Lifetime in Action
public class LifetimeDemoController : Controller
{
    private readonly ILoggerService _logger1;
    private readonly ILoggerService _logger2;

    // Constructor injection for two logger instances
    public LifetimeDemoController(ILoggerService logger1, ILoggerService logger2)
    {
        _logger1 = logger1;
        _logger2 = logger2;
    }

    public IActionResult Index()
    {
        if (_logger1 == _logger2)
        {
            _logger1.Log("Same instance.");
        }
        else
        {
            _logger1.Log("Different instances.");
        }

        return View();
    }
}- If the service is registered as Singleton,
_logger1and_logger2will point to the same instance. - If it’s Scoped, the instances will be the same for the current request but different for different requests.
- If it’s Transient, each injection will create a new instance, so
_logger1and_logger2will be different.
Using Dependency Injection in Middleware
ASP.NET Core also supports injecting services into middleware components, allowing for the clean separation of concerns when processing HTTP requests.
Example: Dependency Injection in Middleware
public class CustomMiddleware
{
    private readonly RequestDelegate _next;
    private readonly ILoggerService _logger;

    public CustomMiddleware(RequestDelegate next, ILoggerService logger)
    {
        _next = next;
        _logger = logger;
    }

    public async Task InvokeAsync(HttpContext context)
    {
        _logger.Log("Processing request...");
        await _next(context);
    }
}

// Register middleware in Startup.cs
public void Configure(IApplicationBuilder app, IHostingEnvironment env)
{
    app.UseMiddleware<CustomMiddleware>();
}
Here, the ILoggerService is injected into the CustomMiddleware via its constructor, and the service can be used inside the InvokeAsync method to log requests.
Creating a Custom Service
You can also create and inject custom services for specific needs. For instance, let’s create a custom email service and inject it into a controller.
Example: Custom Email Service
- Define the interface and implementation:
public interface IEmailService
{
    void SendEmail(string to, string subject, string body);
}

public class SmtpEmailService : IEmailService
{
    public void SendEmail(string to, string subject, string body)
    {
        // Logic for sending email
        Console.WriteLine($"Sending email to {to}: {subject}");
    }
}- Register the service in
Startup.cs:
public void ConfigureServices(IServiceCollection services)
{
    services.AddSingleton<IEmailService, SmtpEmailService>();
}- Inject and use the service in a controller:
public class EmailController : Controller
{
    private readonly IEmailService _emailService;

    public EmailController(IEmailService emailService)
    {
        _emailService = emailService;
    }

    public IActionResult Send()
    {
        _emailService.SendEmail("user@example.com", "Welcome", "Thanks for signing up!");
        return View();
    }
}
Conclusion
Dependency Injection in ASP.NET Core allows for cleaner, more modular, and maintainable code. By using DI, you can decouple your components, making it easier to manage dependencies and enhance testability. Whether you’re injecting services into controllers, middleware, or other components, ASP.NET Core’s DI framework provides a flexible way to manage your application’s dependencies.
Understanding and applying DI in ASP.NET Core is essential for building scalable, maintainable, and testable applications.


Leave a Reply